Why the MVA‑31 Matters for Aristo Owners
The JZS161 Toyota Aristo (1999–2005) came with Toyota’s Electro Multi Vision (EMV) DVD navigation that locks the factory audio, amplifier, and climate controls together. If you’ve tried to swap in an aftermarket head unit, you know the pain: oddball connectors, no standard ISO plugs, and a dash panel that won’t accept a typical double‑DIN.
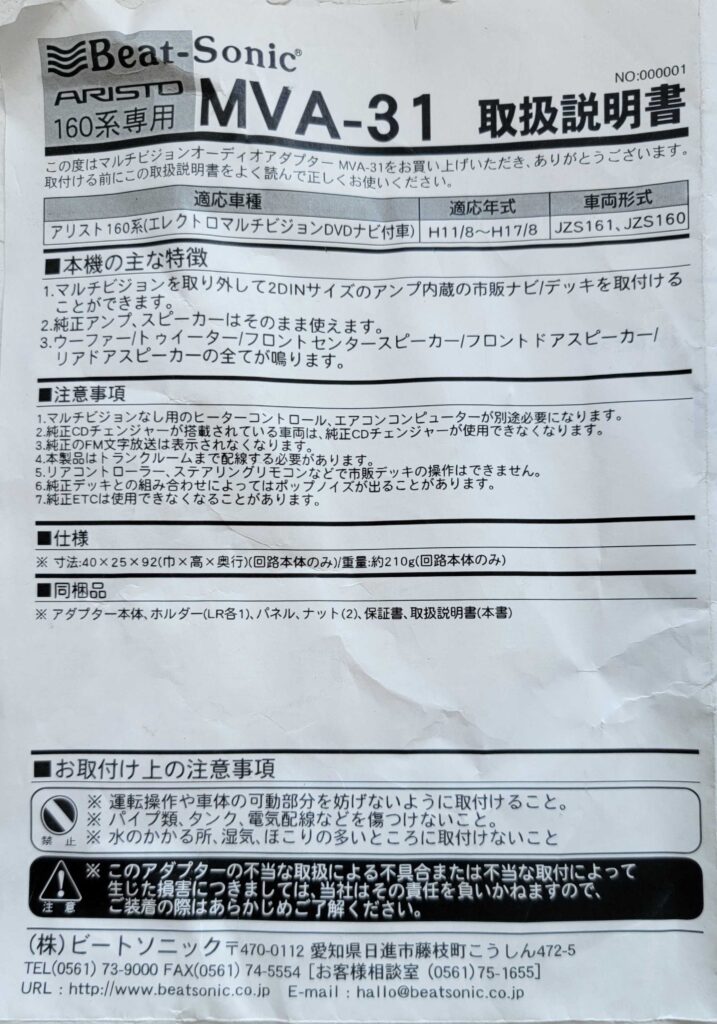
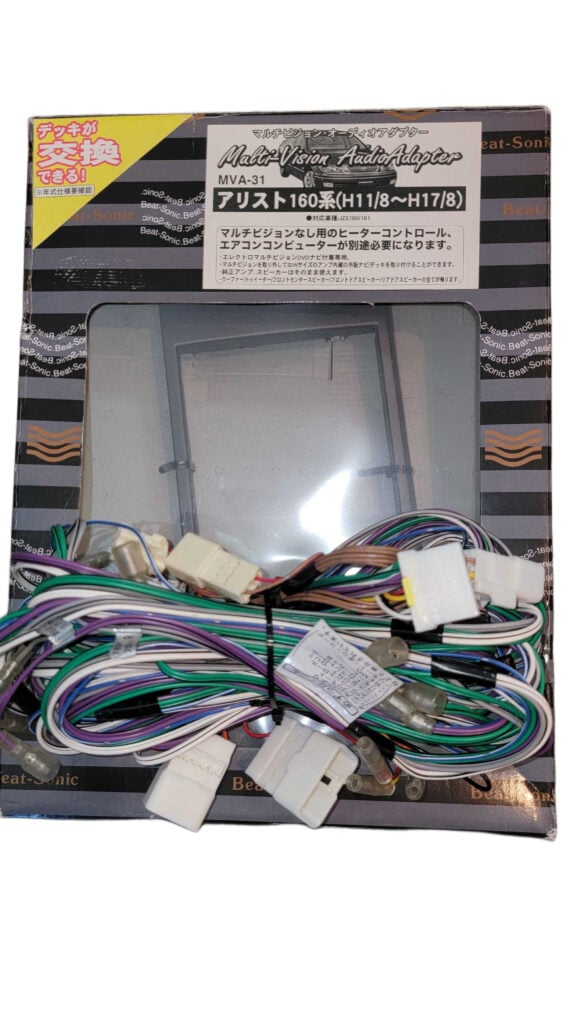
Beat‑Sonic’s MVA‑31 fixes that. It’s an audio integration adapter designed specifically for the JZS160/JZS161 Aristo with factory DVD‑ROM navigation and JBL 8‑speaker system. The kit bridges your new head unit to the OEM amplifier/speakers and provides a factory‑style 2‑DIN fascia and brackets so everything fits and looks OEM.
Key benefits:
- Plug‑and‑play harnessing—no splicing of factory wiring
- Retains the OEM amplifier and speakers for seamless integration
- Includes 2‑DIN fascia and brackets for a clean install
- Made for EMV/DVD‑nav cars so you avoid the common “no‑audio” trap
- Factory‑look finish that matches the Aristo interior
Compatibility at a Glance
- Chassis: JZS160/JZS161 Toyota Aristo (Series 2; approx. Aug 1999–Aug 2005)
- Factory system: EMV/DVD navigation with JBL 8‑speaker Premium Sound
- Steering position: Right‑hand‑drive (JDM)
⚠️ Series 1 owners (Aug 1997–Aug 1999): your car usually uses the Beat‑Sonic MVA‑32. Double‑check the build month and the presence of DVD‑ROM nav before ordering.
What’s in the Box
Typical MVA‑31 kit contents:
- Integration adapter main unit
- 2‑DIN fascia panel (factory‑look finish)
- Mounting brackets (L/R)
- Hardware and nuts
- Printed instruction manual (Japanese)
Note: Many installs also require swapping to a separate Toyota/Lexus climate control assembly (commonly sourced from the UCF30/31 LS430 family or Aristo‑specific panels) so the HVAC is independent from the EMV screen. This is not included with MVA‑31.
How the MVA‑31 Works (Plain English)
The factory EMV head unit routes audio into the OEM amplifier via non‑standard connectors. The MVA‑31 intercepts these connections and presents standard head‑unit inputs/outputs so modern double‑DIN decks (CarPlay/Android Auto, etc.) can drive the OEM amp and speakers without re‑wiring the entire car. The fascia/brackets solve the physical fitment.
Pre‑Install Checklist
- Confirm build date and options (Series 2, EMV/DVD nav, JBL 8‑speaker).
- Choose your head unit (wired/wireless CarPlay, Android Auto, nav, etc.).
- Source a separate climate control panel compatible with the Aristo dash swap.
- Gather tools: panel poppers, 10mm socket, Phillips screwdriver, trim tape, multimeter.
- Plan your mic/USB routing and backup camera strategy.
Installation Overview (Combined Guide)
1. Pre‑Install Checklist
- Disconnect the battery negative terminal.
- Confirm build date and options (Series 2, EMV/DVD nav, JBL 8‑speaker).
- Choose your head unit.
- Source a separate climate control panel.
- Gather tools: panel poppers, 10mm socket, Phillips screwdriver, trim tape, multimeter.
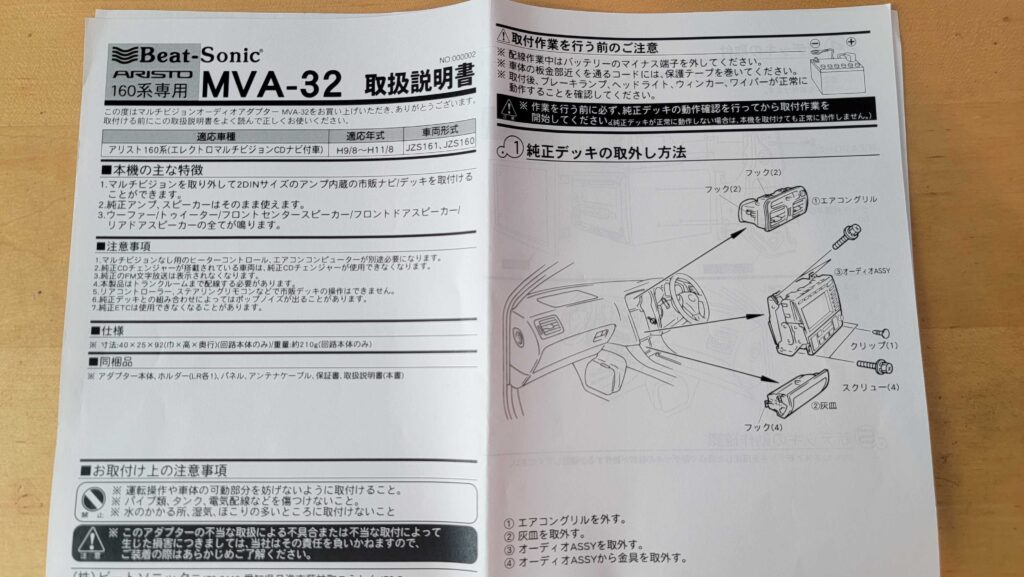
2. Removing the Factory Deck (from manual)
- Remove the air conditioning grille.
- Remove the ashtray.
- Remove the audio assembly (EMV unit).
- Remove brackets/metal fittings from the audio assembly.
(Diagram shows clips, hooks, and screws securing A/C grille, ashtray, and EMV.)
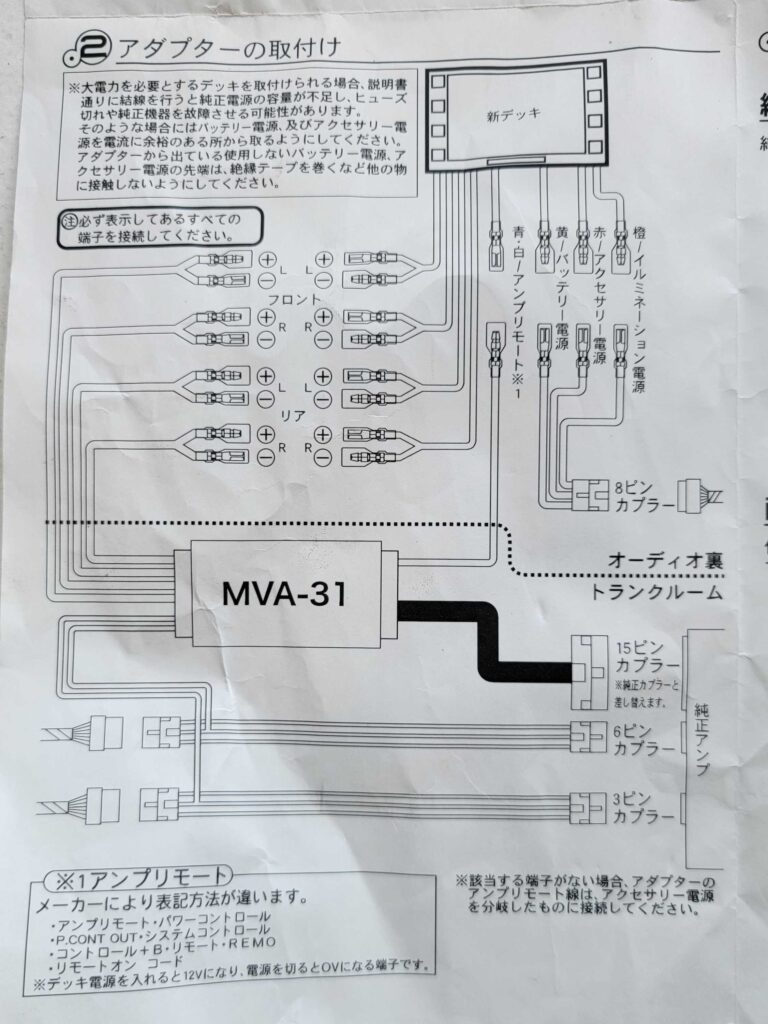
3. Wiring the Adapter (from manual)
- Connect all terminals as shown in Beat‑Sonic’s wiring diagram.
- Key connections: Front L/R, Rear L/R, Subwoofer, Power, Ground, Accessory, Illumination.
- Blue wire = Amplifier Remote (must be connected).
- Depending on the head unit brand, this may be labeled as: AMP REM, P.CONT, REMO, B+ CONTROL, etc.
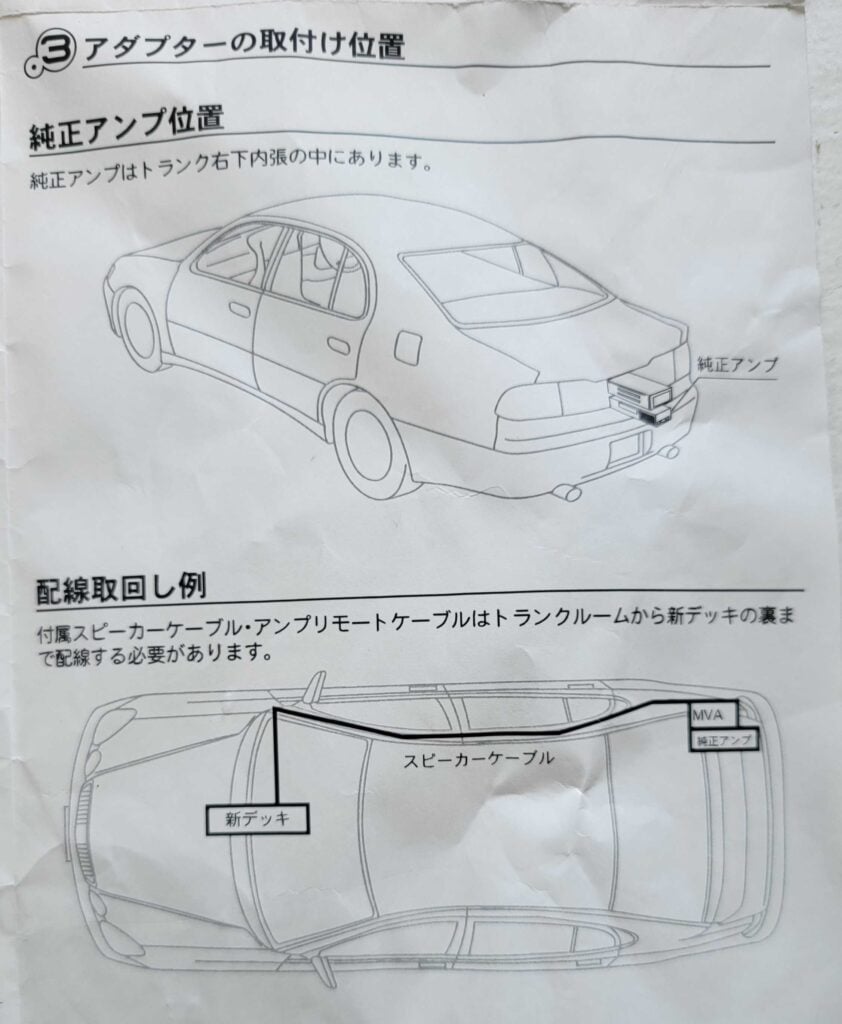
4. Adapter Location & Cable Routing
- The factory amplifier is in the right rear trunk panel.
- Run the included speaker and amp remote cables from the trunk (MVA‑31) forward to the new head unit.
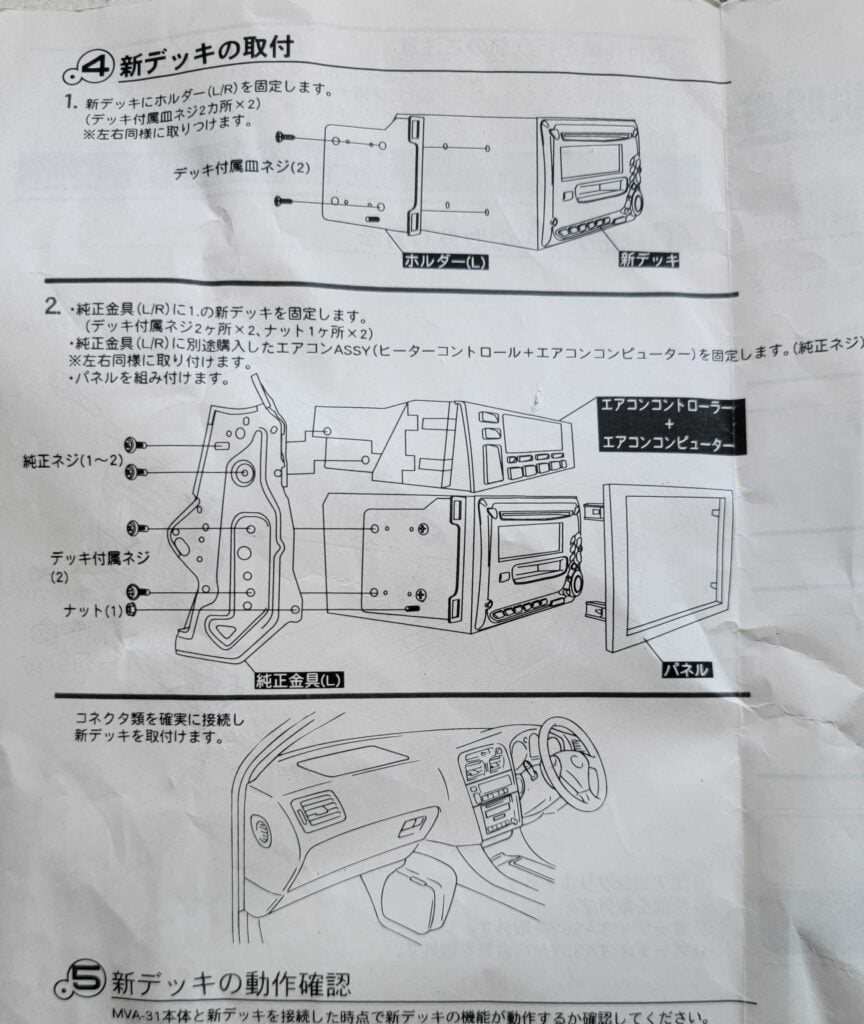
5. Installing the New Head Unit
- Attach the new head unit to the provided L/R holders with screws.
- Secure the assembly to the OEM metal brackets with factory screws and nuts.
- Re‑install heater control + AC computer.
- Attach fascia panel.
- Confirm connectors are secure and mount the assembly into the dash.
6. Function Test
- With MVA‑31 and head unit connected, verify power and functionality.
- Confirm all speakers output sound.
- Check brake lamps, headlights, indicators, and wipers operate normally.
Common Pitfalls & Pro Tips
- No sound after install? Confirm the amp remote turn‑on (AMP REM/ANT CONT) is energized when the HU powers up. Some head units label this “P.CONT.”
- Ground hum or hiss: Use a solid chassis ground for the HU and adapter; avoid sharing with high‑current circuits.
- Dim illumination or no dimming: Check ILL+ / ILL‑ connections. Many HUs expect ILL+ only.
- Reverse camera image reversed or no signal: Verify the HU’s camera polarity setting and the reverse trigger wire.
- HVAC inoperative: The MVA‑31 doesn’t control HVAC. Ensure your separate climate panel is fully connected and compatible.
- Fader/balance locked: Some JBL systems sum channels. Use HU settings to adjust; verify the adapter’s front/rear mapping.
Sound Quality Expectations
The factory JBL amp is tuned for OEM sources. With a modern HU feeding the MVA‑31, you’ll typically notice:
- Cleaner pre‑out signal vs. aging OEM electronics
- Better EQ/time alignment from modern DSP features
- Lower noise floor if grounding is correct
Audiophile‑level upgrades (DSP/amp/speaker replacements) are still possible later, but the MVA‑31 is the least invasive Phase 1.
FAQ
No—the kit is specifically targeted at RHD JDM Aristo with EMV/DVD nav. LHD GS owners should use platform‑specific Beat‑Sonic kits.
In most EMV cars, yes. The HVAC logic lives with the EMV stack; separating it requires a dedicated HVAC panel.
Not natively. Use a SWC interface (e.g., Axxess/ASWC‑1) compatible with your head unit.
Yes, via the OEM amplifier path. Output level and crossover are controlled by your HU.
They typically use Beat‑Sonic MVA‑32 due to different EMV architecture.

MVA-32 Wiring Diagram for 08/1999 build date and older